Showing posts with label technology. Show all posts

Basement Renovation: Part I

by 8:10 PM
The following story is somewhat of a “catch up”—since the process of improving and finishing our basement has involved years of procrastination, interspersed with periods of creativity, hard work, rudimentary planning, adaptive reuse and carpentry. Here goes…

I suppose I am not alone in saying that the state of our basement (or cellar, if you prefer) has always been a sore spot in our household. It seems this is the case for many homeowners.

When we built the house almost 25 years ago, the basement served only as storage for a growing accumulation of little-used “stuff” and a place to do laundry. The best thing about it was that due to the poured concrete walls and our well-drained lot, it was always dry as a bone.

About 15 years ago, I embarked on a project that divided the open space into a couple of workable areas devoted to specific tasks. First of these was a workshop for myself, which included the mechanical systems like the furnace and water heater, followed by another area that was used for storage and laundry. The storage and laundry areas were enclosed by simple stud-framed walls. The workshop was a slightly different matter—the “wall” separating it from the rest of the basement was simply formed from 3 large matching bookcases and a desk/bookcase unit, all connected together, then with the 2-foot gap between the top of the cases and the floor joists above filled in with 2’’ x 4’’ framing. A 32” gap between the bookcases became a convenient doorway, and the upper stud-framed portions sections above the bookcases were covered in paneling. The result looks like a wall of built-in units, which they truly are—and since they are not load bearing, they fit their purpose just fine.

The storage room I had created included a half-dozen large steel shelving units, which were filled rather quickly. After a few years, it became clear that more storage was needed for the overflow, so I built in some closets toward the front of the house, near the foot of the stairs. This area was relatively convenient to the kitchen, and would offer a fine place for my wife to store some of her larger serving items like large chafing dishes and pans, food warmers and seasonal serving and entertaining accessories that she uses just a few times a year.

Originally, I had intended this closet wall—which was about 10’ across—to include a central 4’ wide, 2’ deep inset where I had planned to place yet another one of my many bookshelves. This would have been flanked by a storage closet on each side. Unfortunately, once I had already framed the wall for this, The Boss said she preferred a whole wall of closet storage, and the inset was walled across and another door added. The end result looks fine but the change in plans on-the-fly resulted in a wall of three 24” bi-fold doors where two 36” bi-fold doors would have saved installation time and been slightly more practical. Henceforth, I resolved to consult The Boss prior to framing.

That covers most of the preliminaries up to the present time, with the exception of the wine cellar built under the stairs. That feature deserves a post of its own, and that’s where we will continue this saga…

The Challenge of Sourcing Appropriate Period Items

by 6:00 PM
Decorative plaque - provided by TudorArtisans.com - USA
If you are interested in architectural and interior design of the Tudor and Elizabethan periods, or you’re looking to restore a home built in a revival of these styles, one of the primary challenges is to find appropriate materials here in the States. Eighty years ago, it was easy to source such items as plaster cornice and mouldings, fireplaces, brackets, corbels, light fixtures, hardware and furniture that would look right in a Tudor-revival home. Today, there is little available. Other than the handful of legacy remnants available from old line US suppliers like Decorators Supply or Fischer & Jirousch, almost no one makes them anymore, aside from high end custom crafters and cabinetmakers.

Today, most suppliers offer a range of classically-inspired products that would fit well into a colonial or Georgian home, but provide almost nothing that is suitable to an earlier time period. Whether it’s a chair rail moulding, a wooden mantel, or even a wooden interior door—the choices are generally limited to very common traditional designs. Think of egg-and-dart, dentil mouldings, colonial casings or the ubiquitous colonial six-panel door and you know what I mean.

Even in my own house, built in 1992, I was limited to these sort of items in terms of availability and budget. I did demand a rather chunky staircase balustrade and had a very large, custom newel post built—I also had a custom mantelpiece made for the family room that was essentially Arts & Crafts in design. Any other resulting detail items I could manage were best described as Victorian (small carved wooden brackets in the dining/living room openings, and faux-plaster ceiling medallions over the kitchen and dining room lights. My doors were six-panel colonial, since the only other affordable and easily-obtainable alternative was a plain surface hollow-core slab door.


Staircase - courtesy Distinctive Country Furniture LTD - UK
As it turned out, the result was ok; many of these items might have been found in similar combination in an “Old English” house of an earlier time—particularly here in America, where styles were often blended together. As time goes on and I embark on future projects, I may remedy this situation to some extent, as far as time and budget allow.

If one has the means to import items from the UK, the issue is not quite as severe. A better selection is available, not to mention salvage items available from both online and brick-and-mortar vendors. In addition, my Twitter feed is full of highly skilled craftsmen who work in stone, plaster, glass, iron and wood, and almost any of them can create something both appropriate and beautiful—for a commensurate price. Sadly, the exchange rate and shipping across the Atlantic remain serious considerations, but for many, this remains a worthy option.

For those who are fearless, and who possess some level of skill and imagination, the remaining alternative is to make these items yourself. If one is able to obtain at least one appropriate decorative item, it is not so hard to make a mold and cast (in plaster or resin) the additional number required. Originals can be shaped in clay, or carved from wood, if one has the patience and requisite skill. Even if one lacks the ability to do hand-work, modern technology makes it possible to model a decorative piece using 3-dimensional software and send a file to a woodshop with a CNC router that can carve the item from a block of wood in a matter of minutes. Not inexpensive, but often less costly than paying a craftsman to make it by hand.

Lovely medieval floor chest - courtesy Early Oak Reproductions - UK
Perhaps the best solution is to use a combination of all these methods when it comes to sourcing decorative items for your period home. Where common or traditional materials can be made to “fit the bill”—feel free to use them and flip the resulting savings into cash that can be used to purchase those few specialty “feature” items that will set your project apart.

Likewise, do not be afraid to try your hand at creating a decorative detail yourself. If it doesn’t turn out quite as perfect as you would have liked, you don’t have to use it in your entrance foyer; integrate it into a bedroom, a back hall, or even a basement rec room—places where any shortcomings will be slightly less visible.

Stone carved head - courtesy Nick Roberson - UK
I would also suggest that at some point you spend the money and have a craftsman build or create some feature item that you can integrate into your interior or exterior design. It may only be a single door, a carving for a fireplace, a plaster panel or a bit of iron hardware, but it will add both value and pride to your finished project. In this age of technology, traditional crafts cannot be allowed to disappear, and it is important that we support them so they will be available to future generations. Today’s best craftsmen work hard to learn their trade and spend many hours researching proper design and technique—whether it involves carving stone, building furniture or modelling in plaster. The results of this speak for themselves. Make use of them if you can.


The Curse of Current Events

by 8:46 PM
Even I am subject to letting my feeling be known when it comes to politics and current events in the news. As are many, I am deeply troubled by the course things have taken since the election of Mr. Trump to our land’s highest office—and I have made mention of it at least once in my TLG Tweets. But I think…only once.

Which is precisely the reason I maintain multiple accounts; most of my gripes and tirades are on my personal account, which is where I focus on other interests like book publishing, advertising, marketing and urban development in the town where I live. Political and personal tweets, as they are, seem to fit in much better there; I don’t feel right subjecting my TLG audience and followers to my political views, even though I expect that, for the most part, their views may be largely sympathetic to my own.

This is especially the case since many of my followers and readers are in the UK. I’m sure many of them are already aware of the issues here in the US, and they have their own to deal with—namely Brexit. In the same way as Trump, that issue has “infested” many of the UK accounts I follow. This is really not surprising, since the subjects are inexorably linked.

The resulting situation has artists, designers, researchers, craftsman, historians, hobbyists and others—people who normally refrain from “dabbling” in daily politics—tweeting up a storm on current political events and policy. For some, it is only a mention here and there. For others, these issues now dominate their daily tweets rather than their usual subjects of interest, and it has now come to the point where they seem unable to focus on anything else.

Being patient, I would not think to block or mute anyone over such a matter; I follow people with some consideration, and I suspect things will return to normal soon enough (or at least closer to normal, after their initial outrage fades).


The biggest problem has become my daily Paper.li newspaper, The ArchRevivalist Daily. Again, I have always tried to select my news “sources” with a great deal of care—accounts that tweet useful and relevant information regarding heritage issues, traditional architecture & design, preservation, etc.—so the newspaper will offer breadth and usefulness.

Lately, however, I have seen a number of ARD issues where the featured story and image is something to do with politics—namely Trump. This is really not what I intended at all, and these stories detract from the primary subject of the newspaper. I recall one issue in particular where one of my usually-relevant sources had perhaps four or five “Trump” tweets or re-tweeted stories posted in one day’s edition. I suppose an improved algorithm on Paper.li’s part could alleviate this to some degree; I'm too busy to do daily content edits and instead rely on their AI to select which stories to “feature.”

As a result, I have been forced to (at least temporarily) take the approach of removing some Twitter accounts from my newspaper source list, at least until they return to tweeting relevant information. I still follow them, of course—I only removed them from the newspaper source list until that times comes again.

I imagine this issue will pass soon enough, but it does pose a significant question to many of us. How much is too much? No one would suggest that we refrain from observing, commenting and even expressing our outrage when it comes to politics and current events. But we must remember there is a time and place to do so, and that getting overwhelmed by such matters can take us off course, muddy our focus, and in the end--make us less happy.


Duretta and O'Kast: The Look of Wood for Less

by 5:00 PM
I have long been fascinated by old building technologies; in particular, some of the materials and designed that were developed during the early 20th century. A few months ago, I discussed magnesite stucco, and this time we’ll take a look at a synthetic stand-in for traditional carved woodwork known as Duretta.

Aside from design, one of the foremost properties considered by architects and builders was the ability to be fireproof. This is precisely why stucco, concrete and brick were so popular, and why asbestos was so common in stucco mix, shingles, siding, flooring and other items used in construction.

The New York firm of G.E. Walter developed Duretta for use as a cast material, used to replicate carved wood and metal. It was used for carved wood paneling and wainscoting, door panels, wall friezes, grilles, fireplaces, rails and even exterior half-timber work. Company literature only describes it as a “plastic, fibrous, composition material” – though its exact formula is not known, the fact that it was clearly described as being fireproof would lead one to think that asbestos and perhaps some gypsum may have made up at least part of the mix.

Finishes for Duretta varied; most items were finished to look like wood, and the company claimed that when so finished, it was practically indistinguishable from the real think. Other pieces were finished to look like hammered metal, and still others were provided a special, more durable finish for exterior work.


G.E. Walter was not the only manufacturer to follow this route – other companies like Cleveland’s Fischer & Jirousch (still in business) also developed similar products, like O’Kast (“oak cast”) which also mimicked the look of carved wood. Some of these old wood panel designs are still available, though I do not believe the O’Kast material is still being used in production.

It is amazing to think that there were once a large number of firms designing and producing cast interior and exterior ornament for buildings in the United States. Today there are only a handful, and most of the currently-available designs are based on classical themes rather than the medieval and tudor styles that were so popular during the late 19th and early 20th centuries. One wonders what happened to some of the old proprietary formulas used for these products, as well as the fate of the molds that were used in their manufacture.

Duretta and O'Kast: The Look of Wood for Less

by 5:00 PM

I have long been fascinated by old building technologies; in particular, some of the materials and designed that were developed during the early 20th century. A few months ago, I discussed magnesite stucco, and this time we’ll take a look at a synthetic stand-in for traditional carved woodwork known as Duretta.

Aside from design, one of the foremost properties considered by architects and builders was the ability to be fireproof. This is precisely why stucco, concrete and brick were so popular, and why asbestos was so common in stucco mix, shingles, siding, flooring and other items used in construction.

The New York firm of G.E. Walter developed Duretta for use as a cast material, used to replicate carved wood and metal. It was used for carved wood paneling and wainscoting, door panels, wall friezes, grilles, fireplaces, rails and even exterior half-timber work. Company literature only describes it as a “plastic, fibrous, composition material” – though its exact formula is not known, the fact that it was clearly described as being fireproof would lead one to think that asbestos and perhaps some gypsum may have made up at least part of the mix.

Finishes for Duretta varied; most items were finished to look like wood, and the company claimed that when so finished, it was practically indistinguishable from the real think. Other pieces were finished to look like hammered metal, and still others were provided a special, more durable finish for exterior work.

G.E. Walter was not the only manufacturer to follow this route – other companies like Cleveland’s Fischer & Jirousch (still in business) also developed similar products, like O’Kast (“oak cast”) which also mimicked the look of carved wood. Some of these old wood panel designs are still available, though I do not believe the O’Kast material is still being used in production.

It is amazing to think that there were once a large number of firms designing and producing cast interior and exterior ornament for buildings in the United States. Today there are only a handful, and most of the currently-available designs are based on classical themes rather than the medieval and tudor styles that were so popular during the late 19th and early 20th centuries. One wonders what happened to some of the old proprietary formulas used for these products, as well as the fate of the molds that were used in their manufacture.

Fenceposts: A Story of Deferred Maintenance

by 7:07 PM
Sometimes a fence is more than just a fence. When I built our house back in 1992, I needed something to help “enclose” the small space created when I pushed the garage back about 15 feet from the front of the house. With an entry to the kitchen placed in-between and room for a small patio on either side of the driveway, the result was a modest “courtyard” that begged to be enclosed by a fence of some sort.

I eventually settled on a white picket fence, which runs only about 8 feet on either side of the driveway, connecting to the house at one side and ending at the property line on the other, then turning back along the boundary there for about 15 feet before ending even-up with the front of the garage. The result was a nice, semi enclosed space, where I could keep a table and chairs on one side and storage/waste bins on the other, all hidden behind a 3 foot fence.

To frame it all off properly, I asked the fence contractor to include some large gate posts on either side of the driveway; something about five feet high and reasonably substantial—about 8” to 12” square. I may have given him a rough sketch, but the design he came up with was almost exactly what I was looking for.

Here you can see the way the fence was designed to wrap around the house and tie it into the landscape.
Before he had started on the project, I had looked at the plans and decided that all of this going on at one side of the house needed to be balanced by something on the other side. As a result, I added an 8 foot length of fence (and a gate post that matched those on the other side) on the opposite side of the house; this also turned at the property line and went back about 24 feet along the boundary, enclosing a small part of the yard surrounding our enclosed porch/garden room. Eventually, this area hidden behind the fence would become known to our children as The Secret Garden.

I was rather happy with the finished result—the fence really served to “anchor” the house and integrate it into the landscape. It also made it appear larger, since it visually stretched the house and the attached fence all the way across the 90 foot lot.

Maintenance & Durability
While the pickets were of cedar and the rest of the fence framing were of pressure-treated lumber, I was concerned that the three large gateposts might be a long term problem due to the fact that their upper portions were not constructed from treated lumber, but shop built off site from standard 2” thick framing pine. They were well-built, with mitered corners, neat moldings and tight joints, but I knew eventually that the weather (and the carpenter ants) might take their toll.

You can see how the upper portion has taken a real beating.
With plenty of paint and stain, the large wooden columns held up pretty well for the first dozen years or so; eventually, however, the top sections and surrounding trim began to rot. Wood filler, calk, and additional paint helped me get through another few years, and the last season or so I even resorted to applying duct tape and a thick coating of FlexSeal ™ sprayed over the worst parts.

This wasn’t the only issue. Many of the nails used to construct these columns were rusting away, with the result that the lower portions—which were built from 1” thick pressure treated lumber—were coming loose from the bottom of the posts, too. As for the balance of the fence, it was still in good shape; the cedar posts would just need a light sanding and maybe a few nails here and there, and the other standard 4x4 posts were solid as a rock. Nevertheless, as I looked at the fence this spring, I knew that it was time for a major restoration.

Planning & Materials
The ground post anchors that the large columns were built upon were still sound; the fluted sides of the columns were cedar, and in very good shape, as was the edge molding at the corners, which only needed a few new nails. Even the horizontal tops of the posts and the finials were not rotted—some straightening, a screw here and there, and some sanding and re-sealing with silicone caulk would bring them up to snuff.

The upper column panels and the molded trim were another story. They had to go, and not wanting to do this job again, I purchased some Azek PVC trim to do the repair work.

The material is not cheap, but it is a dream to work with—it saws better than wood and takes screws better than wood, too. I wouldn’t use it in every application, but here, where it is painted white anyway and is so exposed to the elements, I have no reservations.

Rebuilt, Re-fastened, caulked and new paint.
I eschewed the mitered corners on that large upper column panels and used butt joints this time around. Again, being painted, I think the result looks just fine. I did miter the upper trim corners carefully, and they look better than the original.

As for the bottom of the posts, the mitered 1” thick panels were re-attached with some new screws and also some stainless L-brackets screwed in at each corner. Not quite as neat as the original, but very secure and will end up being hidden by paint and the flowers which grow in front of the fence.

Hopefully the result--with regular maintenance--should hold up for a good while longer. We can only hope; the core materials still seem pretty sound, and the post remain well-anchored.

That’s Part One of our fence project. Part two will involve some spade work, as we revitalize the plantings in front of and behind the fence.


Fenceposts: A Story of Deferred Maintenance

by 7:07 PM

Sometimes a fence is more than just a fence. When I built our house back in 1992, I needed something to help “enclose” the small space created when I pushed the garage back about 15 feet from the front of the house. With an entry to the kitchen placed in-between and room for a small patio on either side of the driveway, the result was a modest “courtyard” that begged to be enclosed by a fence of some sort.

I eventually settled on a white picket fence, which runs only about 8 feet on either side of the driveway, connecting to the house at one side and ending at the property line on the other, then turning back along the boundary there for about 15 feet before ending even-up with the front of the garage. The result was a nice, semi enclosed space, where I could keep a table and chairs on one side and storage/waste bins on the other, all hidden behind a 3 foot fence.

To frame it all off properly, I asked the fence contractor to include some large gate posts on either side of the driveway; something about five feet high and reasonably substantial—about 8” to 12” square. I may have given him a rough sketch, but the design he came up with was almost exactly what I was looking for.

Here you can see the way the fence was designed to wrap around the house and tie it into the landscape.

Before he had started on the project, I had looked at the plans and decided that all of this going on at one side of the house needed to be balanced by something on the other side. As a result, I added an 8 foot length of fence (and a gate post that matched those on the other side) on the opposite side of the house; this also turned at the property line and went back about 24 feet along the boundary, enclosing a small part of the yard surrounding our enclosed porch/garden room. Eventually, this area hidden behind the fence would become known to our children as The Secret Garden.

I was rather happy with the finished result—the fence really served to “anchor” the house and integrate it into the landscape. It also made it appear larger, since it visually stretched the house and the attached fence all the way across the 90 foot lot.

Maintenance & Durability
While the pickets were of cedar and the rest of the fence framing were of pressure-treated lumber, I was concerned that the three large gateposts might be a long term problem due to the fact that their upper portions were not constructed from treated lumber, but shop built off site from standard 2” thick framing pine. They were well-built, with mitered corners, neat moldings and tight joints, but I knew eventually that the weather (and the carpenter ants) might take their toll.

You can see how the upper portion has taken a real beating.
With plenty of paint and stain, the large wooden columns held up pretty well for the first dozen years or so; eventually, however, the top sections and surrounding trim began to rot. Wood filler, calk, and additional paint helped me get through another few years, and the last season or so I even resorted to applying duct tape and a thick coating of FlexSeal ™ sprayed over the worst parts.

This wasn’t the only issue. Many of the nails used to construct these columns were rusting away, with the result that the lower portions—which were built from 1” thick pressure treated lumber—were coming loose from the bottom of the posts, too. As for the balance of the fence, it was still in good shape; the cedar posts would just need a light sanding and maybe a few nails here and there, and the other standard 4x4 posts were solid as a rock. Nevertheless, as I looked at the fence this spring, I knew that it was time for a major restoration.

Planning & Materials
The ground post anchors that the large columns were built upon were still sound; the fluted sides of the columns were cedar, and in very good shape, as was the edge molding at the corners, which only needed a few new nails. Even the horizontal tops of the posts and the finials were not rotted—some straightening, a screw here and there, and some sanding and re-sealing with silicone caulk would bring them up to snuff.

The upper column panels and the molded trim were another story. They had to go, and not wanting to do this job again, I purchased some Azek PVC trim to do the repair work.

The material is not cheap, but it is a dream to work with—it saws better than wood and takes screws better than wood, too. I wouldn’t use it in every application, but here, where it is painted white anyway and is so exposed to the elements, I have no reservations.

Rebuilt, Re-fastened, caulked and new paint.
I eschewed the mitered corners on that large upper column panels and used butt joints this time around. Again, being painted, I think the result looks just fine. I did miter the upper trim corners carefully, and they look better than the original.

As for the bottom of the posts, the mitered 1” thick panels were re-attached with some new screws and also some stainless L-brackets screwed in at each corner. Not quite as neat as the original, but very secure and will end up being hidden by paint and the flowers which grow in front of the fence.

Hopefully the result--with regular maintenance--should hold up for a good while longer. We can only hope; the core materials still seem pretty sound, and the post remain well-anchored.

That’s Part One of our fence project. Part two will involve some spade work, as we revitalize the plantings in front of and behind the fence.


Stucco is Stucco, Right? Not Exactly.

by 9:04 AM

If you love traditional Old English homes, there can be no doubt you will run into some type of stucco or exterior plaster at one time or another. It may be on the exterior of an ancient cob house, the roughcast finish on a Voysey house, the fancy plaster pargetting of an Elizabethan townhouse or even some exterior panels on a “stockbroker Tudor”.

Built in 1914, the traditional-styled English Cottage I lived in for 8 years in Akron’s Goodyear Heights had asbestos stucco covering its first (ground) floor and foundation, with cedar shingles on the upper floor. (I’ve always thought wall shingles were a poor-man’s substitute for the clay tiling used on many English vernacular houses.) The stucco on that house had been painted over, and due to some neglected maintenance, had begun to crack in several places.

On the driveway side of the house, the stucco and its expanded wire lath were both coming loose from the exterior sheathing, to the extent that I could easily insert my hand fully into the gap for almost a foot, which was right next to our dining room window. This could have been the result of some foundation settling and some moisture penetration, but it eventually resulted in the decision to remove a 6’ x 4’ section of the stucco and make a major repair.

Of course, I did not know this was asbestos stucco at the time—but it came off in large pieces, and not being too concerned with short term exposure outdoors—I have no regrets or adverse effects some 25 years later. There was horse-hair in that stucco, too!

What I did know is that I could not just go out and buy modern stucco mix and plop it onto the wall. I first reattached the wire lath, which was actually still in pretty decent shape, and added some securely stapled chicken wire here and there, just for good measure. I then referenced an old-fashioned stucco recipe which I probably sourced from The Old House Journal—remember, this was pre-Internet. That meant plenty of lime and not just Portland cement.

Having a substantial section of the house exposed while repairs are being made can be discomforting, but thankfully I was blessed for an extended dry period. A thick base coat, covered with a second, thinner brown coat, brought the surface to the proper level. This was followed by a finish coat—with some small pebbles added—to try and match the rest of the exterior wall surface as best as I could. I wasn’t too happy with the match until I got the hose and sprayed the surface ever-so-lightly with some water from our hose, which smoothed it to the extent that it finally matched the old stucco perfectly. Once this section of the house was coated with paint to match the rest, you could not tell the repair from the original work.

The house needed more repairs higher up on the facade, which had more cracks but was not failing to the extent that it was on the one side, probably due to the fact that it was sheltered from the prevailing winds, rain and direct sunlight. Sadly, I never got around to doing more repairs before we began the process of designing and building our new house in 1992. Nevertheless, I was proud to note during a recent neighborhood visit that the house still retains its original exterior materials and my repair looks just as solid as it did 25 years ago. Even the front of the house has held up to some extent, though it does look worse for the wear.

When we built our new(er) house, I considered using some synthetic stucco for the exterior, but decided against it for cost reasons. Over the years, some of these newer, lighter synthetic blends, installed over various types of insulating foam, have come under fire, having failed due to poor installation techniques or unsuitability for a particular climate. If I was to utilize stucco today, I would probably go with a more traditional type.

Which brings me to the discovery of a third type of stucco, with which I was totally unfamiliar—and that is magnesite stucco.

Some of the more popular brands were Kragstone,  Kellastone and Rocbond, proprietary blends of magnesium carbonate powder, asbestos and sand, which was mixed with an oily, magnesium chloride solution. It was not a cement-like product at all, and contained no lime, gypsum, or water. The result was a more plastic-like, all-mineral stucco product that was highly resistant to cracking and dried rock-hard when applied at least a half-inch thick.

Magnesite stucco was applied in two coats, and its unique properties allowed it to be applied even during freezing weather. Apparently it was introduced some time before WWI, and became quite popular before fading into obscurity a few decades later. In a few places, like California, there are some stucco specialists who can still repair and apply it, as it was often used for flooring surfaces, interior and exterior steps, and even countertops, sinks and bathtubs!

Here in Ohio, I know magnesite stucco was used in a number of locations many years ago, though I have not personally come across it myself. It seems obvious that repairs would represent quite a challenge, and I can’t see the use of more traditional types of stucco for repair being compatible. If you have any experience with this unique type of stucco, I’d like to hear about it.

Stucco is Stucco, Right? Not Exactly.

by 9:04 AM

If you love traditional Old English homes, there can be no doubt you will run into some type of stucco or exterior plaster at one time or another. It may be on the exterior of an ancient cob house, the roughcast finish on a Voysey house, the fancy plaster pargetting of an Elizabethan townhouse or even some exterior panels on a “stockbroker Tudor”.

Built in 1914, the traditional-styled English Cottage I lived in for 8 years in Akron’s Goodyear Heights had asbestos stucco covering its first (ground) floor and foundation, with cedar shingles on the upper floor. (I’ve always thought wall shingles were a poor-man’s substitute for the clay tiling used on many English vernacular houses.) The stucco on that house had been painted over, and due to some neglected maintenance, had begun to crack in several places.

On the driveway side of the house, the stucco and its expanded wire lath were both coming loose from the exterior sheathing, to the extent that I could easily insert my hand fully into the gap for almost a foot, which was right next to our dining room window. This could have been the result of some foundation settling and some moisture penetration, but it eventually resulted in the decision to remove a 6’ x 4’ section of the stucco and make a major repair.

Of course, I did not know this was asbestos stucco at the time—but it came off in large pieces, and not being too concerned with short term exposure outdoors—I have no regrets or adverse effects some 25 years later. There was horse-hair in that stucco, too!

What I did know is that I could not just go out and buy modern stucco mix and plop it onto the wall. I first reattached the wire lath, which was actually still in pretty decent shape, and added some securely stapled chicken wire here and there, just for good measure. I then referenced an old-fashioned stucco recipe which I probably sourced from The Old House Journal—remember, this was pre-Internet. That meant plenty of lime and not just Portland cement.

Having a substantial section of the house exposed while repairs are being made can be discomforting, but thankfully I was blessed for an extended dry period. A thick base coat, covered with a second, thinner brown coat, brought the surface to the proper level. This was followed by a finish coat—with some small pebbles added—to try and match the rest of the exterior wall surface as best as I could. I wasn’t too happy with the match until I got the hose and sprayed the surface ever-so-lightly with some water from our hose, which smoothed it to the extent that it finally matched the old stucco perfectly. Once this section of the house was coated with paint to match the rest, you could not tell the repair from the original work.

The house needed more repairs higher up on the facade, which had more cracks but was not failing to the extent that it was on the one side, probably due to the fact that it was sheltered from the prevailing winds, rain and direct sunlight. Sadly, I never got around to doing more repairs before we began the process of designing and building our new house in 1992. Nevertheless, I was proud to note during a recent neighborhood visit that the house still retains its original exterior materials and my repair looks just as solid as it did 25 years ago. Even the front of the house has held up to some extent, though it does look worse for the wear.

When we built our new(er) house, I considered using some synthetic stucco for the exterior, but decided against it for cost reasons. Over the years, some of these newer, lighter synthetic blends, installed over various types of insulating foam, have come under fire, having failed due to poor installation techniques or unsuitability for a particular climate. If I was to utilize stucco today, I would probably go with a more traditional type.

Which brings me to the discovery of a third type of stucco, with which I was totally unfamiliar—and that is magnesite stucco.

Some of the more popular brands were Kragstone,  Kellastone and Rocbond, proprietary blends of magnesium carbonate powder, asbestos and sand, which was mixed with an oily, magnesium chloride solution. It was not a cement-like product at all, and contained no lime, gypsum, or water. The result was a more plastic-like, all-mineral stucco product that was highly resistant to cracking and dried rock-hard when applied at least a half-inch thick.

Magnesite stucco was applied in two coats, and its unique properties allowed it to be applied even during freezing weather. Apparently it was introduced some time before WWI, and became quite popular before fading into obscurity a few decades later. In a few places, like California, there are some stucco specialists who can still repair and apply it, as it was often used for flooring surfaces, interior and exterior steps, and even countertops, sinks and bathtubs!

Here in Ohio, I know magnesite stucco was used in a number of locations many years ago, though I have not personally come across it myself. It seems obvious that repairs would represent quite a challenge, and I can’t see the use of more traditional types of stucco for repair being compatible. If you have any experience with this unique type of stucco, I’d like to hear about it.

In This Case, I'll Say Bravo to "Faux"

by 5:35 PM
To some, the very thought of using one material to simulate another is a vile concept; the quest for “truthfulness” in every aspect of building construction is of utmost importance—and anything that might be considered “fake” or “simulated” should be shunned at all costs.

Of course, this truthfulness has a price, in pure monetary terms, maintenance requirements, or in sustainability. That’s why I gave up the game a long time ago, and decided that I would happily compromise when needed—and if the results looked fine from ten or twenty feet away.

I admire the philosophy of the Craftsman movement, but I cannot afford to sustain it in my own building projects. Clay wall tiles or even wood shingles are beautiful, but I have substituted vinyl where I wanted that effect. Clay or even slate roof tiles are always preferred, of course…but the very-expensive dimensional composite roof that I finally managed to afford 15 years after I moved into my house will have to do (and it does look wonderful). Likewise, the Tudor-style vertical timbering found in some of my gables is wood, yes—but wood that was wrapped in white aluminum, so I wouldn’t have to paint it every few years. I could go on, but I think you get my point.

I know this approach may sound like heresy, but the overall effect is pretty effective, and frankly, I think the house looks better than a lot of modern “Mock-Tudor” houses I’ve seen that do use slightly more traditional materials. This is probably due to the fact that the overall design and proportions are more authentic—the second floor really is jettied out over the front entrance porch, the roof is the proper pitch, and the extra detail I’ve added, like the carved floor-level banding, real wood corbels and even the flowerbox—make it look…right.

Which brings me to the subject of this post, which is a new product available in the UK: Telford-based Faux Wood manufactures and sells reproductions of English oak planks, which have been developed for replacing high-maintenance timber used on Tudor-revival homes. It turns out that a few years ago, one of their customers asked if they could replace the rotten mock Tudor planks on a house facade with a maintenance-free alternative, that better resembles timber than the smooth PVC.

The product that they finally developed is molded from original oak timbers, using high-density rigid polyurethane. It comes in a range of colors, and is designed to be as realistic as possible. While not cheap – about $45 wholesale/$62 retail for a 10 foot plank, I think the product certainly hits the sweet spot with a combination of great looks and low/no-maintenance qualities.

Overall, I think it represents a great example of when original thinking, great technology and good design come together to solve an age-old problem. To read more about Faux Wood, check out this article in the Shropshire Star.

In This Case, I'll Say Bravo to "Faux"

by 5:35 PM
To some, the very thought of using one material to simulate another is a vile concept; the quest for “truthfulness” in every aspect of building construction is of utmost importance—and anything that might be considered “fake” or “simulated” should be shunned at all costs.

Of course, this truthfulness has a price, in pure monetary terms, maintenance requirements, or in sustainability. That’s why I gave up the game a long time ago, and decided that I would happily compromise when needed—and if the results looked fine from ten or twenty feet away.

I admire the philosophy of the Craftsman movement, but I cannot afford to sustain it in my own building projects. Clay wall tiles or even wood shingles are beautiful, but I have substituted vinyl where I wanted that effect. Clay or even slate roof tiles are always preferred, of course…but the very-expensive dimensional composite roof that I finally managed to afford 15 years after I moved into my house will have to do (and it does look wonderful). Likewise, the Tudor-style vertical timbering found in some of my gables is wood, yes—but wood that was wrapped in white aluminum, so I wouldn’t have to paint it every few years. I could go on, but I think you get my point.

I know this approach may sound like heresy, but the overall effect is pretty effective, and frankly, I think the house looks better than a lot of modern “Mock-Tudor” houses I’ve seen that do use slightly more traditional materials. This is probably due to the fact that the overall design and proportions are more authentic—the second floor really is jettied out over the front entrance porch, the roof is the proper pitch, and the extra detail I’ve added, like the carved floor-level banding, real wood corbels and even the flowerbox—make it look…right.

Which brings me to the subject of this post, which is a new product available in the UK: Telford-based Faux Wood manufactures and sells reproductions of English oak planks, which have been developed for replacing high-maintenance timber used on Tudor-revival homes. It turns out that a few years ago, one of their customers asked if they could replace the rotten mock Tudor planks on a house facade with a maintenance-free alternative, that better resembles timber than the smooth PVC.

The product that they finally developed is molded from original oak timbers, using high-density rigid polyurethane. It comes in a range of colors, and is designed to be as realistic as possible. While not cheap – about $45 wholesale/$62 retail for a 10 foot plank, I think the product certainly hits the sweet spot with a combination of great looks and low/no-maintenance qualities.

Overall, I think it represents a great example of when original thinking, great technology and good design come together to solve an age-old problem. To read more about Faux Wood, check out this article in the Shropshire Star.

Outstanding 360-degree View of Chastleton House Long Gallery

by 4:56 AM
.
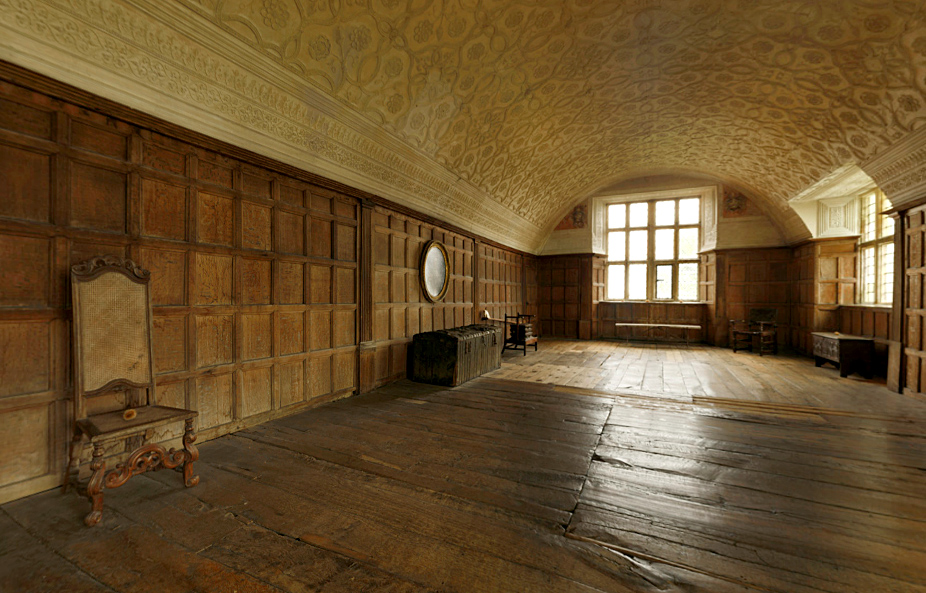
As part of it's ongoing series of 360-degree views of outstanding architecure, The Guardian/Observer features the work of Rowan Moore, who introduces a spectacular interactive 360-degree panoramic view of this classic example of the Jacobean long gallery.
CLICK HERE OR ON THE PHOTO TO VIEW THE 360-PANORAMA.


PHOTO COURTESY OF THE GUARDIAN

The Guardian/Observer describes it thus:
"A smallish but satisfying example is in Chastleton House in the Cotswolds, built by a rich wool merchant (or possibly lawyer), whose family later dissipated his wealth and so were unable to alter the original building. Nikolaus Pevsner called the decoration of Chastleton "blatantly nouveau riche, even barbaric, uninhibited by any consideration of insipid good taste", but it now it looks gentle and charming, softened by wobbles in wood and plaster and the fall of light. It is also more bare than it would have been, in the absence of its original artworks and tapestries."


Outstanding 360-degree View of Chastleton House Long Gallery

by 4:56 AM
.
As part of it's ongoing series of 360-degree views of outstanding architecure, The Guardian/Observer features the work of Rowan Moore, who introduces a spectacular interactive 360-degree panoramic view of this classic example of the Jacobean long gallery.
CLICK HERE OR ON THE PHOTO TO VIEW THE 360-PANORAMA.


PHOTO COURTESY OF THE GUARDIAN

The Guardian/Observer describes it thus:
"A smallish but satisfying example is in Chastleton House in the Cotswolds, built by a rich wool merchant (or possibly lawyer), whose family later dissipated his wealth and so were unable to alter the original building. Nikolaus Pevsner called the decoration of Chastleton "blatantly nouveau riche, even barbaric, uninhibited by any consideration of insipid good taste", but it now it looks gentle and charming, softened by wobbles in wood and plaster and the fall of light. It is also more bare than it would have been, in the absence of its original artworks and tapestries."


Pardon Our Plaster Dust as we Build a Better-Looking Site for TLG

by 8:13 PM
AN INSPIRATIONAL PHOTO OF THE LONG GALLERY AT HATFIELD HOUSE - COURTESY OF ANGEL + BLUME BLOG

In an effort to build a more attractive and comprehensive site for TLG, we've been re-building the site from the ground up to provide a better look and a much wider range of content. First, we found an exciting new Blogger template, courtesy of Dzignnine, and managed to integrate it with a number of useful widgets and tools.

We are re-working and expanding the book store, enhancing several of our special content areas covering music, food and lifestyle...and generally "tarting up" the site to make it more appealing and inspiring. There is still much to do and many areas to organize, but the effort has begun in earnest and we hope our readers will be happy. Here's all the best for a great 2012!


MS.

Pardon Our Plaster Dust as we Build a New Site for TLG

by 8:13 PM

AN INSPIRATIONAL PHOTO OF THE LONG GALLERY AT HATFIELD HOUSE - COURTESY OF ANGEL + BLUME BLOG

In an effort to build a more attractive and comprehensive site for TLG, we've been re-building the site from the ground up to provide a better look and a much wider range of content. First, we found an exciting new Blogger template, courtesy of Dzignnine, and managed to integrate it with a number of useful widgets and tools.

We are re-working and expanding the book store, enhancing several of our special content areas covering music, food and lifestyle...and generally "tarting up" the site to make it more appealing and inspiring. There is still much to do and many areas to organize, but the effort has begun in earnest and we hope our readers will be happy. Here's all the best for a great 2012!


MS.

ABC's Extreme Makeover Gives Cleveland-area Family Tudor-Revival Home

by 6:15 PM
With thousands of onlookers lining the streets, the cameras of ABC's "Extreme Makeover: Home Edition" rolling, the principals of Marous Brothers Construction and their sister, Sue Marous, watched as the Paul Anderson's family arrived at their new home on Anthony Street in Willoughby, Ohio. The company was selected to be the builder and general contractor for the project, which took six days to complete with the help of an estimated 4,000 volunteers working around the clock. It was the 177th episode of the popular show.

PHOTO CREDIT: The News Herald.

Sue Marous said the company was "deeply honored" to have been chosen by producers of "Extreme Makeover" to build the 3,500-square-foot, English Tudor Revival style home for a family with special needs. The four-bedroom home replaced the family's modest 50-year-old, 1,200-square foot house. Chris Auvil, who serves as staff architect for Marous Brothers Construction, said the new home has many modern features including fingerprint readers on doors and bar-code readers on kitchen cabinets to identify various food items.

Though many modern examples of revival style homes fall well short in terms of historical accuracy, scale, proportion and visual appeal, we'd have to admit that--based on our initial impressions--this particular home is pretty well done. It certainly appears more authentic than most modern attempts, and although we might have suggested a few alternate choices in terms of some materials and details (like the white columns at the entrance) they basically got it right.

Beautiful Laser Images of Gothic Structures are Works of Art Themselves

by 2:57 PM
A small team of experts at the Glasgow School of Art have have reach a whole new level of sophistication with their innovatine and super-precise laser image modeling techniques, which are millions of times more detailed and accurate than even the best photographs or films. In fact, the images are precise down to a fraction of a millimeter.

PHOTO CREDITS: The New York Times.

Not only are the images of incredible value in terms of documentation and potential restoration, but one look at the images themselves reveals some very unique and awe-inspiring designs. Using their advanced technology, the experts can now imagine what objects may have looked like long ago. With the ability to simulate the effects of climate change, urban encroachment or other natural or man-made disasters, they also have a way to project what a site may look like in the future as well.


After scanning a decaying iron bridge in Dundee, the team eventually took on additional projects, at sites like Stirling Castle and Rosslyn Chapel, the 15th-century Gothic fancy to which The Da Vinci Code has brought a great deal of attention. According to a NYT article:
The basic principle behind the laser technology is simple: A box, with a laser inside, sits on a tripod; as the box slowly rotates 360 degrees, the laser, moving up and down, bounces its beam off whatever is solid in front of it. In so doing, it registers some 50,000 points in space every second. Traditional surveyors might produce a couple of hundred measurements a day, prone to subjectivity and human error. Lasers collect millions of measurements per hour. A scanner can even identify certain materials, determining whether something is, say, made of glass or stone.
The benefits of storing and distributing state-of-the-art views of the world’s most precious cultural and historic sites at a relatively low cost are plain. Canadian-born Douglas Pritchard is the wizard behind the Digital Design Studio at the art school, heading the Scottish laser expedition with David Mitchell, director of Historic Scotland’s Technical Conservation Group. Check out the complete NYT article HERE.

Found: Digital Library Preserves Decorative Arts Books Online

by 8:14 AM
We recently came across The Digital Library for the Decorative Arts and Material Culture, and online image and text collection that forms a part of the University of Wisconsin's Digital Collection. We all know there are thousands of valuable architecture and design resources out there in the from of old books that hopefully will be scanned and organized in the years ahead; this particular collection is a nice example of how these books can be made available online.

PHOTO CREDITS: Univ. of Wisconsin Digital Collection.

The book we've highlighted here is titled The house decorator and painter's guide; containing a series of designs for decorating apartments, suited to the various styles of architecture - by Henry William Arrowsmith. Originally printed in London by Thomas Kelly in 1840, the 120-page book features 61 illustrations, many of which are hand-colored. The full online version of the book can be found HERE.


The Digital Library collects and creates electronic resources for study and research of the decorative arts, with a particular focus on Early America. Included are electronic texts and facsimiles, image databases, and Web resources. Made possible by the Chipstone Foundation, the project is produced at the University of Wisconsin Madison General Library System.

Gothic PC Marries Technology with Medieval Style

by 7:49 AM
Self-styled "Datamancer" - Richard "Doc" Nagy is well-known for his unique and inspirational "steampunk" contraptions, which can be seen on TV shows such as SciFi Channel's Warehouse 13, who contracted with him to have some special props made. Nagy uses a lot of creativity and ingenuity to combine modern technology with turn-of-the-century and medieval-inspired decorative designs--resulting in truly unique and useful art.

PHOTO CREDIT: datamancer.net

One of my personal favorites is the "Archbishop" Gothic PC, [above] a PC/LCD/Keyboard/"Mouse" combo that was built using Gothic design elements. The LCD monitor lives inside a scratch-built Gothic arch with quatrefoil designs and stained-glass doors. The PC case features the same Morisco-patterned glass, brass embellishments, a hinged lid for access to the drives and hardware, and soft, ambient red lighting. Built as a gaming computer - it's a real high-performance PC, not just a showpiece.

While this particular model is sold, Richard will be happy to build another one for you upon request. While "steampunk" inspired design might seem to be at the very edge of what we cover at TLG, the Victorian and Gothic themes used in so many of the designs are quite appropriate to Medieval and Tudor interiors. After all, there can be little doubt that the "Archbishop" PC would look better in your library than a beige box.

To see more of Nagy's work, check out his remarkable website and blog.

The Tudor House that Twitters

by 4:45 PM
Dr Andy Stanford-Clark has fitted his grade 1 listed Tudor cottage with hundreds of sensors, allowing everything from energy usage to the burglar alarm to be relayed by the the internet messaging service Twitter. The result? Now the rustic and charming cottage has been converted into one of the most hi-tech homes in the world.

PHOTO CREDIT: www.telegraph.co.uk.

Now the house can tell its owner when his dinner is ready, if someone is at the door or when a mouse has been caught in a trap. If he leaves a light on or a water tap running, the house will automatically tweet him - instantly alerting the 43-year old engineer and master inventor for computer firm IBM. Dr Stanford-Clark started renovating the house five years ago, installing sensors to monitor power usage, but later realized the potential that Twitter had to offer.

Stanford-Clark explains that he is interested in how how objects could be connected to the internet - especially "tweetjects" - objects that Twitter. Not surprisingly, the house can also be controlled over a mobile phone, allowing him to switch on appliances in the cottage when he is out of the house. “It's a bit of a showcase for the technology,” he said.

Happily, the high-tech system makes use of wireless sensors wherever possible because the cottage is a listed building. To read the entire article, go HERE.
Powered by Blogger.